Thursday, December 13, 2012

Glassing the decks

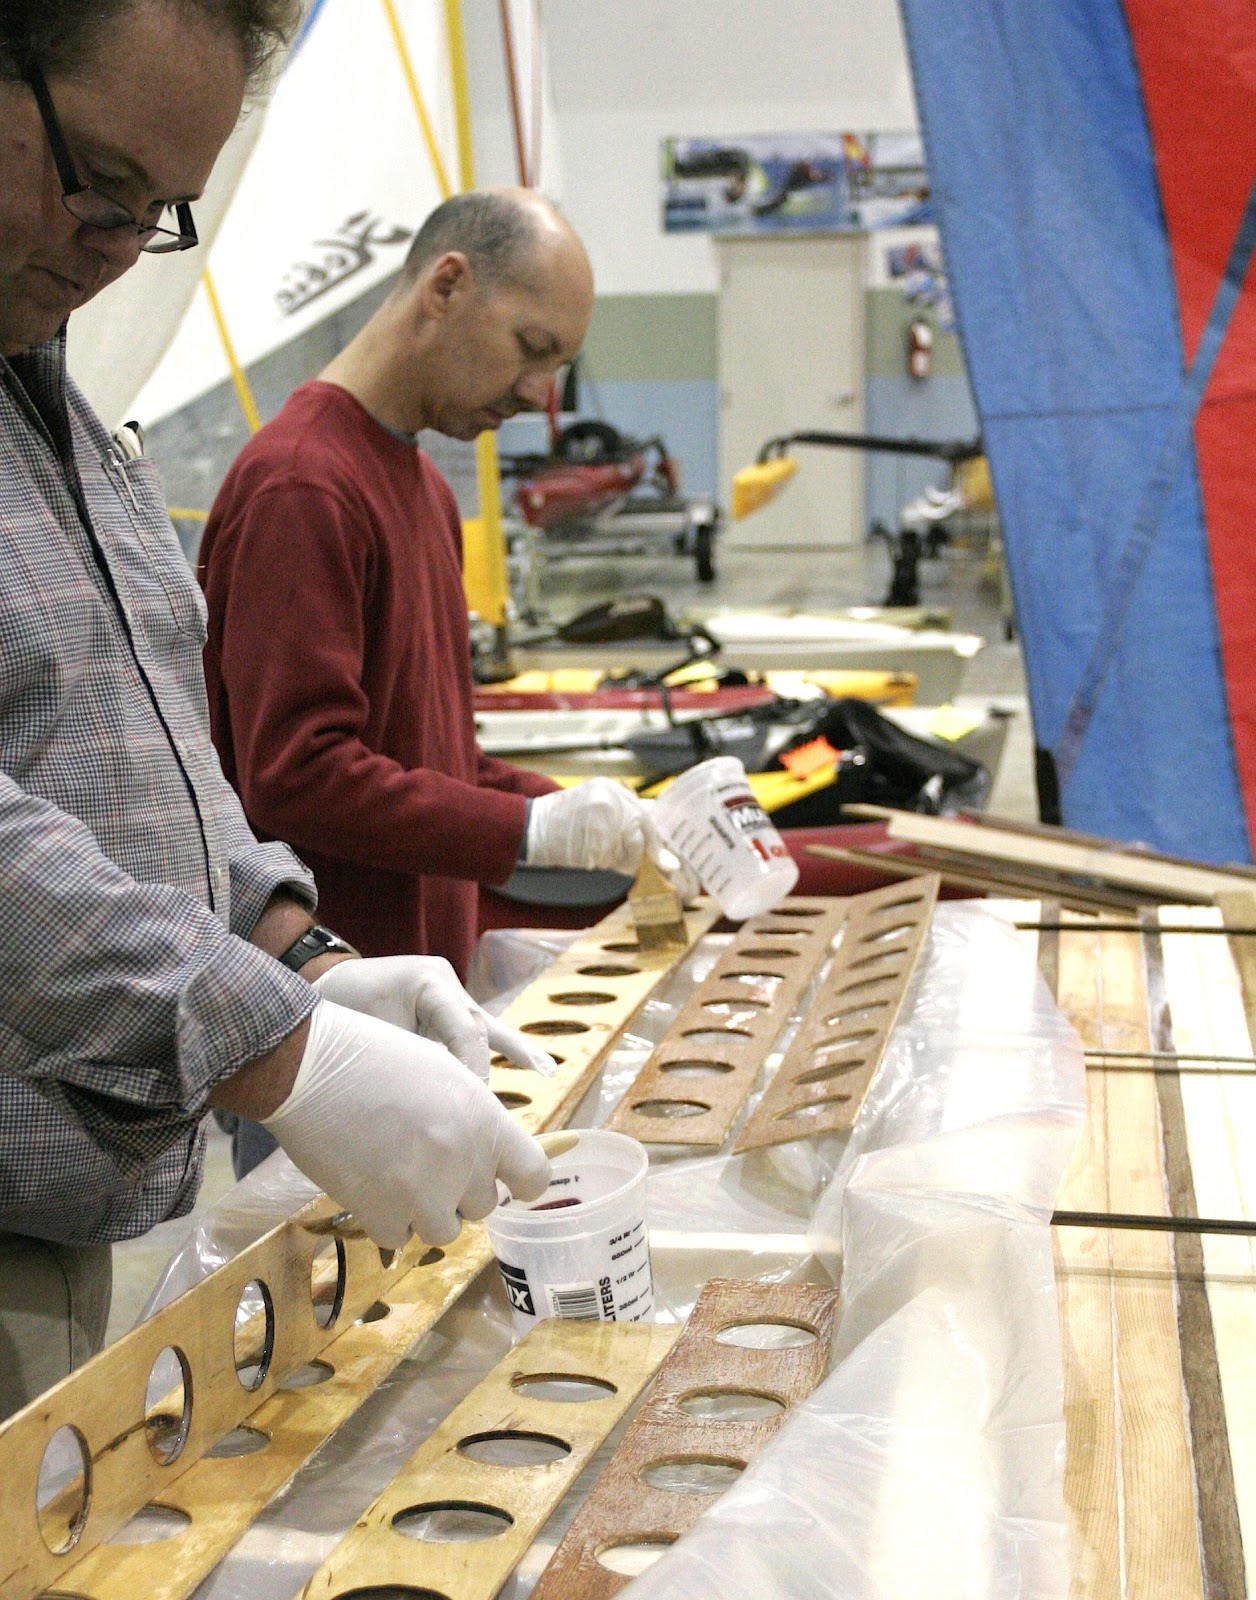
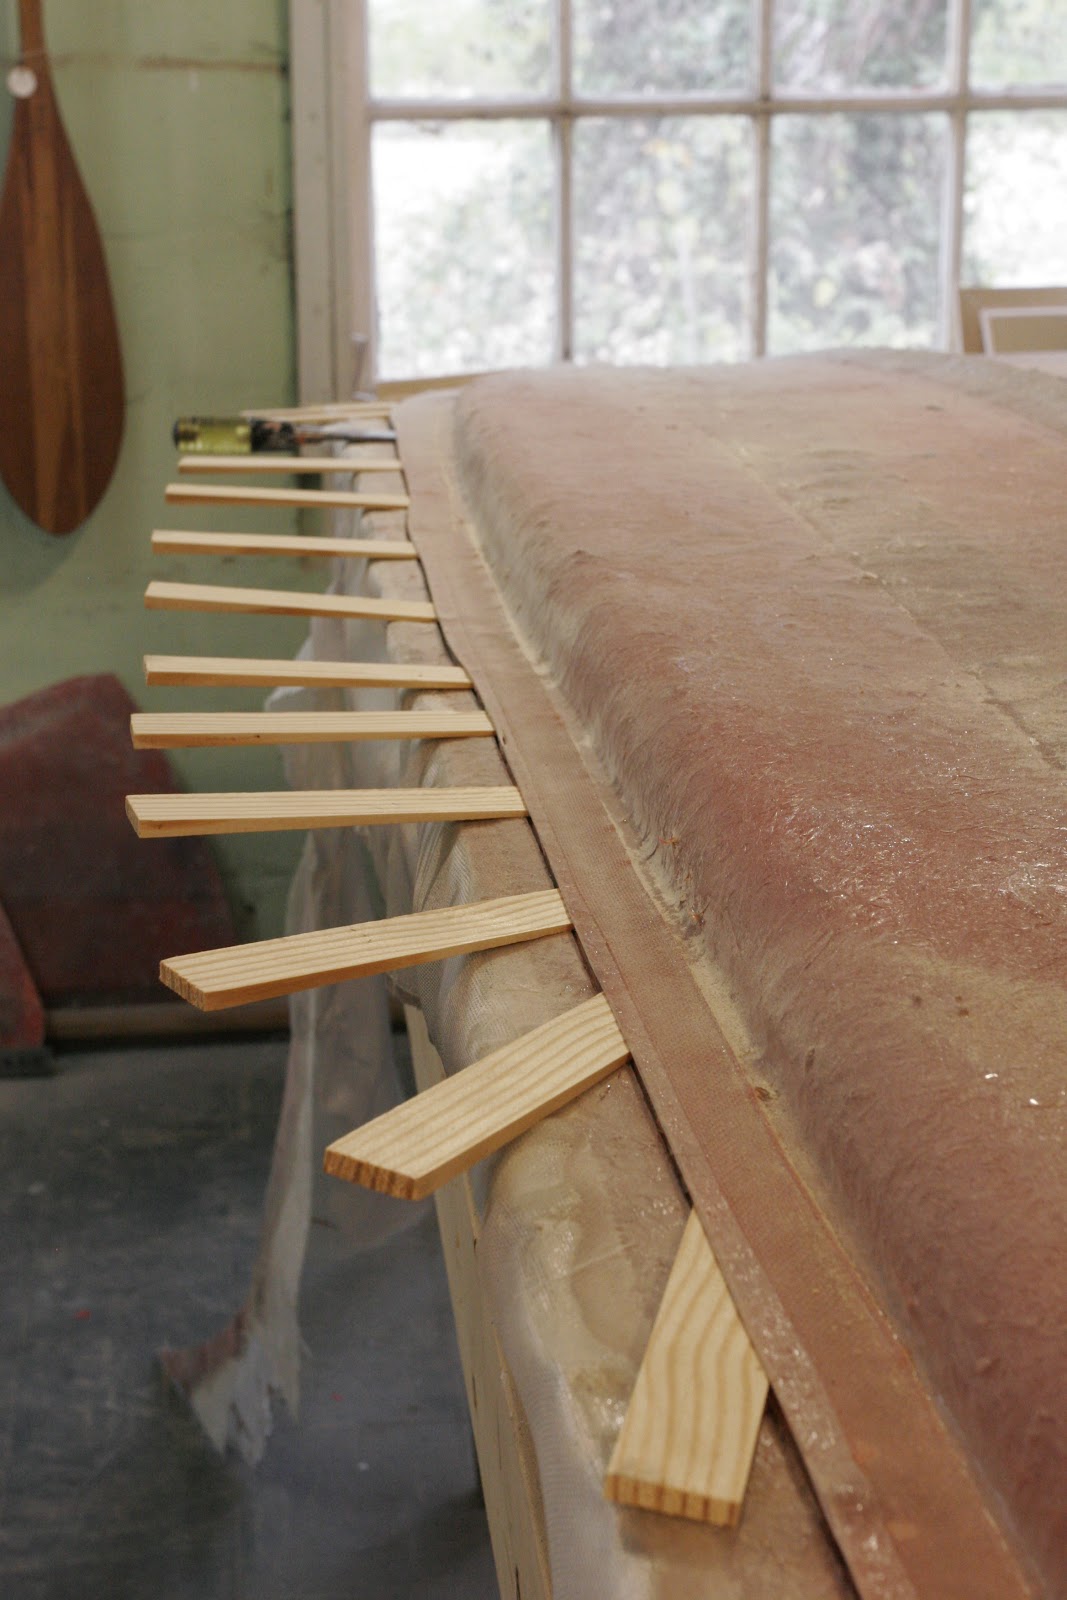
This week we added a layer of fiberglass fabric to the top sides of the decks.  The underside of the decks had been glassed in a previous session.  On the underside we used a 6.5 oz plain weave cloth.  This is nice and strong but needs a fair amount of resin to fill the weave.  We did not need to fill the weave to a glossy finish because this is a hidden surface.  On the top sides we were looking for a glossy finish.  To keep things light and to see the wood as well as possible, we chose the lightest fabric in our supply chest.  It is a .55 oz cloth that is super light, like gossamer.  It wets out easily and is pliable enough to wrap around the deck edge.  This way the entire wood strip deck is encased in a glass / epoxy matrix.
For this application, we are using an epoxy made by Resin Research.  It is a super clear UV inhibited epoxy formulated for the surfboard industry.  We like it a lot.


Thursday, December 6, 2012

Class update: deck fixtures

The fitted decks


The paddle board board building class is getting to the fun parts: deck fixtures and prep for the top glass.

On Tuesday we trimmed the deck panels to fit the hulls.  Next we sanded with a vacuum sander.  It was then time to decide on the placement of the deck fixtures: tie downs and the hull  access port.

Because this board is hollow, there is the space for a deck access port which allows you to store the phone, camera, clif bar etc. inside the hull.  The leash cups/tie downs allow for a waterproof pack to be secured on the deck for a trip.

After the locations were picked out, we used a forstner bit to cut holes for the leash cups and a jig saw to cut a hole for the port.
Drilling a hole for the tie down


Hull interior showing stringers
Deck thickness is 1/4 of an inch.  These strips are walnut and bass wood.
Tie down before epoxy
Hull access port showing lid and knock out.


Beveling the underside of the deck for a good fit.


Wednesday, November 14, 2012

Paddle Board Building Class!

We are conducting the paddle board building class at St. Louis Sail and Paddle.  This post shows the November / December class.  New classes will be offered regularly, check the "Classes" link above.

The students have designed their decks and we are close to finishing the glue ups.  Next week we will be glassing the decks and installing deck gear (leash cups/tie downs, and access port and a breather vent.)
If we keep up the great progress they can be paddling in December!


Sunday, November 11, 2012

New mold

We are co-designing and fabricating a new line of boards for a local company.
The details of the board will be announced with the launch of the board, but some of the construction details are our processes and fine material for the blog.

The bottom plug of the new board was gel-coated last week.  This was the tooling gel coat that will be the working surface of the mold.
Then Friday and Saturday the backing glass was layered onto the mold.  When you wet layup glass with vinyl ester and probably poly ester you begin to appreciate why these resins are referred to in the industry as laminating resins.  They do not have the adhesive properties of epoxies, they are sticky but function best sticking to their own laminations.  These resins do not cure at the surface unless wax dissolved in styrene is added.  This prevents air from affecting the surface.  Air inhibits the curing of these resins.  So as you are laying down layers of glass and ester resins, you leave out the wax and the subsequent layers are able to chemically bond to the uncured surface of the previous layer.

It makes the building up of wet molds easy.
Today we cut a clean edge on the layup with a thin mineral disk and used a chisel, wedges and time to separate the new mold from it's plug.

The mold looks great. We will cast a test part this week.


Monday, November 5, 2012

Give me that old time Machinist

Charlie C. at Industrial Machine Sales in Alton, ILL. is on the job.
We spent several hours coming through his parts bins a few weeks ago to come up with items needed to fabricate the slickest shaft machine ever.  His system of organization is chaotic but he found some great parts.
He was unwilling to sell me these parts though, unless I hired him to build it.  He really wanted to do this so how could I say no.
Last Friday, Ingo and I played hooky and drove up to see him.  We delivered some missing pillow block bearings and gave him the latest specs we needed from the machine.
He gave us a brief lesson on good machining and he was off to the races.
In a few weeks we should be spinning shafts.


Tuesday, October 30, 2012

SEA STATE SUP Kit board


Today we glassed the bow and stern decks to the hull.
It is our first kit board.
Two additional stringer blocks will be added in the standing area.  There is also some gel coat re-touching to do at the deck joints.  Once these things are done, it will be ready for the SUP building class that begins next Tuesday night at St. Louis Sail and Paddle.
The molds are ready for the next set of parts and we will spray in the gel coat tomorrow.

In preparation for the class, we ordered epoxy, leash cups, breather vents, fins, additional fin boxes and more gel-coat.
The board looks good now but add a little wood and the two tone style will be great!
Glass 10/5 kit board with loose cedar strips.
Bow deck showing flange where wood strip deck attaches,


Monday, October 29, 2012

First deck castings out of the molds

We mixed the barrel of resin with a drill paddle.  Next we located some possible barrel pumps on Grainger.com.  If anyone can suggest a good hand pump for this application, please tell us.
Grainger is closed on the weekend so we were able to extract some resin with a hose.  This enabled us to cast the two deck parts.
Today we will trim the parts and prep for glassing them to the hull.


The stripped molds, ready to go again.

Thursday, October 25, 2012

Hickory Nuts for the winter

A cold front came through town at about 5pm.  Earlier in the day it was up to 84 degrees which is crazy for October 25th on the edge of the Great Planes.  But it dropped.
It is 49 out now and tomorrow night it might hit freezing.
That is perfectly normal but it is a little unsettling to me, a displaced Alabamian.
This is the time of year I get a little scared and feel like burying Hickory nuts.
No Hickory trees near here, so I an collecting shop supplies for the winter.
Today we had the long awaited run to Advanced Plastics Inc.
In addition to the drum of vinyl ester resin, we purchased 40 yards of 6 oz cloth, 50 pounds of chopped strand mat, 50 pounds of biaxial glass cloth and an equal amount of woven roving.

Shane and Richard dropped by to chat and were coerced into helping us unload.
Thanks!


That's the stuff !

Sunday, October 21, 2012

Non-traditional plug fabrication

Having never learned surfboard shaping with a foam blank and a Skill 100 planer, I approached our paddle board plugs more like a small thin boat hull.
This means math and lofting.
On paper we decided on the overall characteristics for the board, next we decided on where the split would be in the form.  Then we start with the bottom half of the hull and build it up from a strong back.  Unlike a our past boats though, the strong back is a plywood plane.  (our second board has the rocker built in to the strong back (see below).
With thin ply, foam and fairing we shape the rails, rocker and concave.  This method allows us to easily keep the board symmetrical.  It also provides a great surface for the mold's flange.

After passes with gel coat, fairing and addition gel coat, the plug / form can get as smooth and fair as you like.


Friday, October 19, 2012

Final call for our November SUP class

We are offering a boat building class in conjunction with St. Louis Sail and Paddle this November.
We have a couple people signed up for the SUP class and we have room for a couple more.
If you are interested please call David @ (314) 308-3753
or Chris at St Louis Sail & Paddle
The final cut off will be Halloween!
http://www.stlouissailandpaddle.com/


The Sea State Stand Up Paddle 
Board Building Class

Build a SUP @ 
St. Louis Sail and Paddle!


WHEN:  4 Tuesday evenings: November 6, 13, 20, 27; 6:30-8pm


WHERE:  St. Louis Sail and Paddle, storage of projects is provided during November.


HOW MUCH:  The fee for the SUP class is $1100


WHAT"S INCLUDED:

• Pre-formed fiberglass hull section of the paddle board (Made in Chesterfield, MO!)
• A selection of beautiful wood strips to choose from: Cherry, Walnut, Bass wood, Cedar and Mahogany.  With these you can design your custom deck look!
• Pre-formed stringers (for internal support)
• 4  yards of 6 oz glass cloth
• 1.5 quarts of epoxy (UV inhibited)
• 7 inch high quality fiberglass fin
• Tie downs for gear
• Pad material
• Breather valve


Sea States Paddle Board is a fiberglass composite hull with a wood strip / glass composite deck. This is and easy project and you will end up with a beautiful and one of a kind watercraft of your own. No prior woodworking skill is needed.  Some hand tools and a power sander is all we will be using.


Instruction and assistance is provided by boat builder, David Kreutz of Sea State Marine.

Class size will be limited. Sign up early!

Saturday, October 13, 2012

Shop work: repairs

This weekend we have some SUP repairs in progress.
A friend has two boards with some damage.  One has a crushed rail and the other has some punctures in the skin. Both are fun looking Pau Hanas.

Tuesday, October 9, 2012

Deck Molds for the SUP

The hull, nose and tail of the Sea State SUP will be made of gel coated fiberglass.  The remainder of the deck will be wood strip construction.
The deck molds popped off of the plugs with little effort!
They have a smooth finish and only require a little finish work on one edge of the bow deck mold.
We got a call from our material supplier.  Our new barrel of resin is in.  495 pounds of liquid parts.
The first kits will be ready in a week.


Sunday, October 7, 2012

Tooling gel coat sprayed on the plugs


Today we sprayed tooling gel coat on the plugs for the bow and stern deck of the SUP.
This will form the molding surface of the mold.  After the gel coat sets up, we will add layers of glass and resin to create a strong durable mold.

After the entire lamination is cured, we will separate it from the plug.  The coating of PVA we sprayed on the plug prevents the mold from sticking.  That is the theory.
But of course "past performance is no guarantee of future earnings."


Tuesday, October 2, 2012

Fabricating the stern deck


Our Paddle Board kit is progressing.  Now that the hull mold is finished, we are working on the deck structures.  The bow deck plug is ready for molding.  We wanted to do the molds for both the bow and stern in one go, so the next step was to get the stern deck plug ready.
We used a similar method, but instead of foam, we used a thin ply and fairing material only.
This part is not intended to be as thick.
Today we will polish the gelcoat finish and prep for molding.


Wednesday, September 26, 2012

Shaft R&D

We were attempting to reinvent the wheel.  Then my wife told me about youtube!
Bringing shaft manufacturing in house is a big goal for us because of the savings we could realize. Actually there are many more reasons.  The fact that we would not have to wait on delivery of ordered shafts and the ability to go with specific colors are two big ones.
So I was trying various methods I thought up to spin shafts of glass on a mandrel.  The removal of the tube is the problem to be overcome.  I tried two things.  One was pva on the mandril and air pressure to remove the part.  The other involved wax!  Crazy.
Christabelle found this guy:
http://www.youtube.com/watch?v=q3wtcNTd9wg
It appears he is making tubes for model rocketry.  Very cool.
We applied his method yesterday and immediately produced a great sample with three different glass schedules.
We had no mylar on hand and to keep cost down we were going to need to find a less expensive substitute.  Tyvek came to mind as it has several similar qualities: Resin doesn't stick to it and it has dimensional stability. (Does not stretch).

To get even wrappings with speed and efficiency we are going to engineer a geared mandril.
That is the next step.
But the hand laid tube looks good and is very strong.


Tuesday, September 25, 2012

SUP deck structure

The Sea State SUP is designed to be sold as a kit.  Finished boards will also be for sale.
The board is made up of 4 panel components.  The largest part is the hull bottom.  It is a structural skin molding of biaxial glass.  This part is the full length of the board and includes the side rails.
The deck structure is composed of the foredeck.  It is also a biaxial glass molded part.
The aft deck is of the same structure and size.
The kit part of this sup is the rest of the deck area.  A selection of wood strips, glass cloth and epoxy are included so you can get creative with the look of this SUP.

When purchased as a kit, the fore and aft decks are already glassed onto the hull.  Stringers are installed.  The only work required is the design and installation of the wood strip deck.

Below are photos of the foredeck structure being formed.  Once this is completed, this part will be molded.