Showing posts with label hydro. Show all posts

Friday, June 23, 2017

Bottom Job

We had the hydro out for the winter.  For the summer boating season we wanted to give the boat an epoxy barrier coat and a proper antifouling bottom job.  We  scraped off some barnacles, sanded and mixed up West system epoxy with barrier coat additive.
After it hardened, we gave it a light sanding.  The ablative paint should keep us clean for a few months of fun.
Ingo added a higher pitch prop and has been racing around with his friend Alden.


Saturday, May 14, 2016

Hydro: Video

We cut down the transom 3 inches and this totally eliminated the cavitation.  Now the boat can hit the top end of this motor.  It is just a 9.9 hp Johnson, but it moves.  The hull should be able to handle up to about a 35hp.  that would be exciting.  We are keeping our eyes peeled for any motors in the area that we could land.  For now this is super fun.
Here is a video of me leaving our creek...


Wednesday, March 30, 2016

Hydo: self draining cockpit/false bottom

Back to work on the hydro.
While it is looking like and ugly duckling, it is getting very close to launch day.
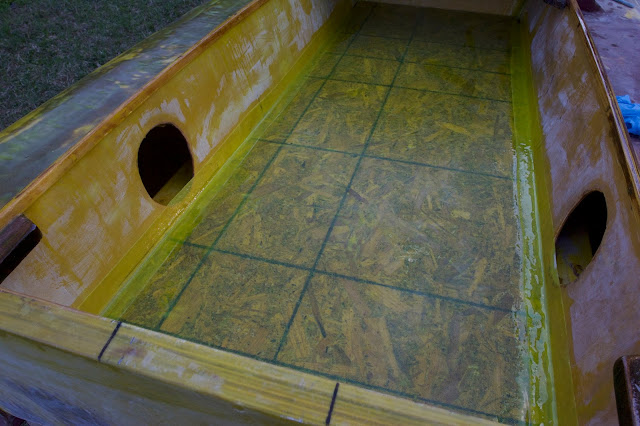
Today we took a big step forward by installing the false bottom.  There are 3.5 inch tall framing members set longitudinally supporting the hulls exterior.  By installing an elevated floor, we will be able to have a self-draining cockpit.  This is a huge quality of life improvement in boating.
We will be able to leave the hydro in a slip for periods of time and not worry about it.
To accomplish this, we cut limber holes on both port and starboard sides of each of the cross members.  These were glassed.
Because the boat will sit with stern down when at rest,  all the limber holes drain to the stern sections of each pontoon.  In the photos, you can see the 6 inch diameter deck ports we cut into the walls of the cockpit.  Any water that makes it into the interior of the hull will end up in the accessible area of the pontoons.
From midship forward, the pontoons are totally filled with 2 pound foam.
This open space in the rear of the pontoons will allow some storage but is mainly for inspection and off season drying of the hull.
The newly installed floor will keep any uninvited water out of the hull's interior.   Next we will mark the appropriate spot for scuppers. After these are cut and glassed, we will be ready for paint.
The surface is getting closer to fair.

Cross member with limber hole visible.
The false bottom is 1/2 osb glassed on all sides.  It is screwed to the cross members.  The glass tape is not so much structural but is primarily used to keep the water headed to the scuppers.
The floor is in.  After paint, the deck plates will be installed.

Tuesday, February 23, 2016

Marine Consignment

I was unhappy with the block type I had on hand for the turn in the cable near the stern.  It was the type that feeds through a wall.  It would be good for running a line under a deck.  We want the cable exposed inside the cockpit.  So, I stopped at Marine Consignment in town and found two perfect Schaefer blocks.  They will work well.
Marine Consignment is always fun to poke around in.  It is somewhat chaotic but there are aisles of great boat parts and great books.


Marine Consignment
Broad Street,  Oriental, NC.


Sunday, January 10, 2016

Hydro: Junk yard Steering

We are trying to keep the cost of the hydro in check so we are fabricating the steering system out of found parts.  (Found in our garage)
To date we have spent about $400 out of pocket on the boat.
Of this, $330 was on glass and epoxy
The balance was on the steering wheel, seat and deck parts at Oriental Consignment.
We are using a cable system to turn the motor.
It is comprised of the wheel, a shaft. a bearing plate, a cable drum and 4 blocks to lead the cable back to the port and starboard sides of the motor.
The shaft is a 5/16ths steel tube we had.  The bearing plate is a front spring strut cap out of my son's 1984 Porsche 944!  He replaced the front struts with Bielsteins and he is happy about that, willing to let the old parts go.
The cable drum is a 4 inch hole saw bit.  This was welded onto the shaft at the appropriate position.
Not only will this provide pulling force on the motor, it also provides a useful backing plate to bolt the steering wheel to.
Today we screwed the bearing plate to the front bulkhead. We added a bit of Starboard behind it to prevent wear through.  We also added a cross strut of mahogany 1x3 that will support the wheel end of the assembly...
The Porsche strut cap is our shaft bearing on the front side.

Here is the hole saw which will allow us to roll stainless steel cable in 2 directions to  both  sides of the motor.

The shaft is about 2 feet long.

Here is the mahogany strut to support the front of the assembly.

A front bearing is still needed.  It could be as simple as a piece of wood with a  snug hole in it.

Good Hydro water!!

Sunday, December 27, 2015

Hydro: Surface Prep

We got the hydroplane outside so we could begin surface preparation.
There will be a great deal of sanding and the weather is nice.  It's good to get out of the shop.
Today we trimmed off the excess glass cloth, sanded the entire exterior and vacuumed the boat off.
The sanding was done with 80 grit.  This is a good aggressive grit to prep for the needed surface fairing.
Here are photos of the current state of the hull:


Friday, December 25, 2015

Hydro: skinning the deck

The last couple of days we have added two layers of 9 oz glass twill set in epoxy.
Prior to this step we had spent several hours adding fairing material to the rough shaped foam.
Additional fairing will be needed after the cloth work is finished but these coats will be much thinner.
To get to this point we were adding serious amounts of fairing material to match the shapes of the pontoons.
In past projects I used Aerosil.  This is the brand name of a colloidal silica product.  I purchased a large volume of it and used it for fairing, structural bonding and fillets.  It is not best suited for fairing because it is harder than proper sanding additives.
Because this project was going to require a large amount of fairing, we ordered a big quantity of phenolic micro balloons from Raka Supply in Florida.
I love this stuff.  Colloidal silica is super light and gets airborne very easily. A respirator is mandatory and the stuff feels weird if you get it on you.  It is also hard to mix into epoxy.
The micro balloons almost absorbs the epoxy like a sponge.  It also doesn't go airborne, but is also feels weird.
Here are some photos of these steps...


phenolic micro balloons


Saturday, November 21, 2015

Hydro: Reworking the pontoons

We spent some time trying to get the pontoons to have an identical shape.  It was a bit tough as we are are sculpting them individually.  To solve the problem, we used a batten.
The batten provided us a fixed reference point off of which we had something to measure and sand the pontoon shapes with a good degree of uniformity.
In the photos below you can see how the batten is used and the steps involved in the process...

This is the port pontoon.  The batten is visible. We cut a slot in the foam from the bow back about 5 feet.  The batten is set in the slot and epoxied in place.  On the starboard side and identical batten is used stretching from the same two exact points.
On top of the 2 part foam we added spray foam to build up the shape we wanted.


We then disk sanded down to the batten and from this edge we were able to form the correct shape.
Phenolic modified epoxy is then used to smooth out the rough sanded shape.
After the whole pontoon is coated with this material, an orbital sander will be used.
After the sanding we will then glass the surface and overlap the hull bottom to seal up the pontoon.
To slowly remove the foam, we are using a variable speed sander set at the slowest rpm.  This allows more control.

Sunday, November 8, 2015

Hydro: top sides shaping

The hydro's top sides are being designed in place.
We had a overall idea of the form of the deck before construction began.  Once we had the hull to work with, we began building the needed structural reinforcements. With these in place, we started  shaping with the leading edge of the pontoons.
These were filled with 2 part 2 pound foam.  We are using a rough grit disk sander to shape these.
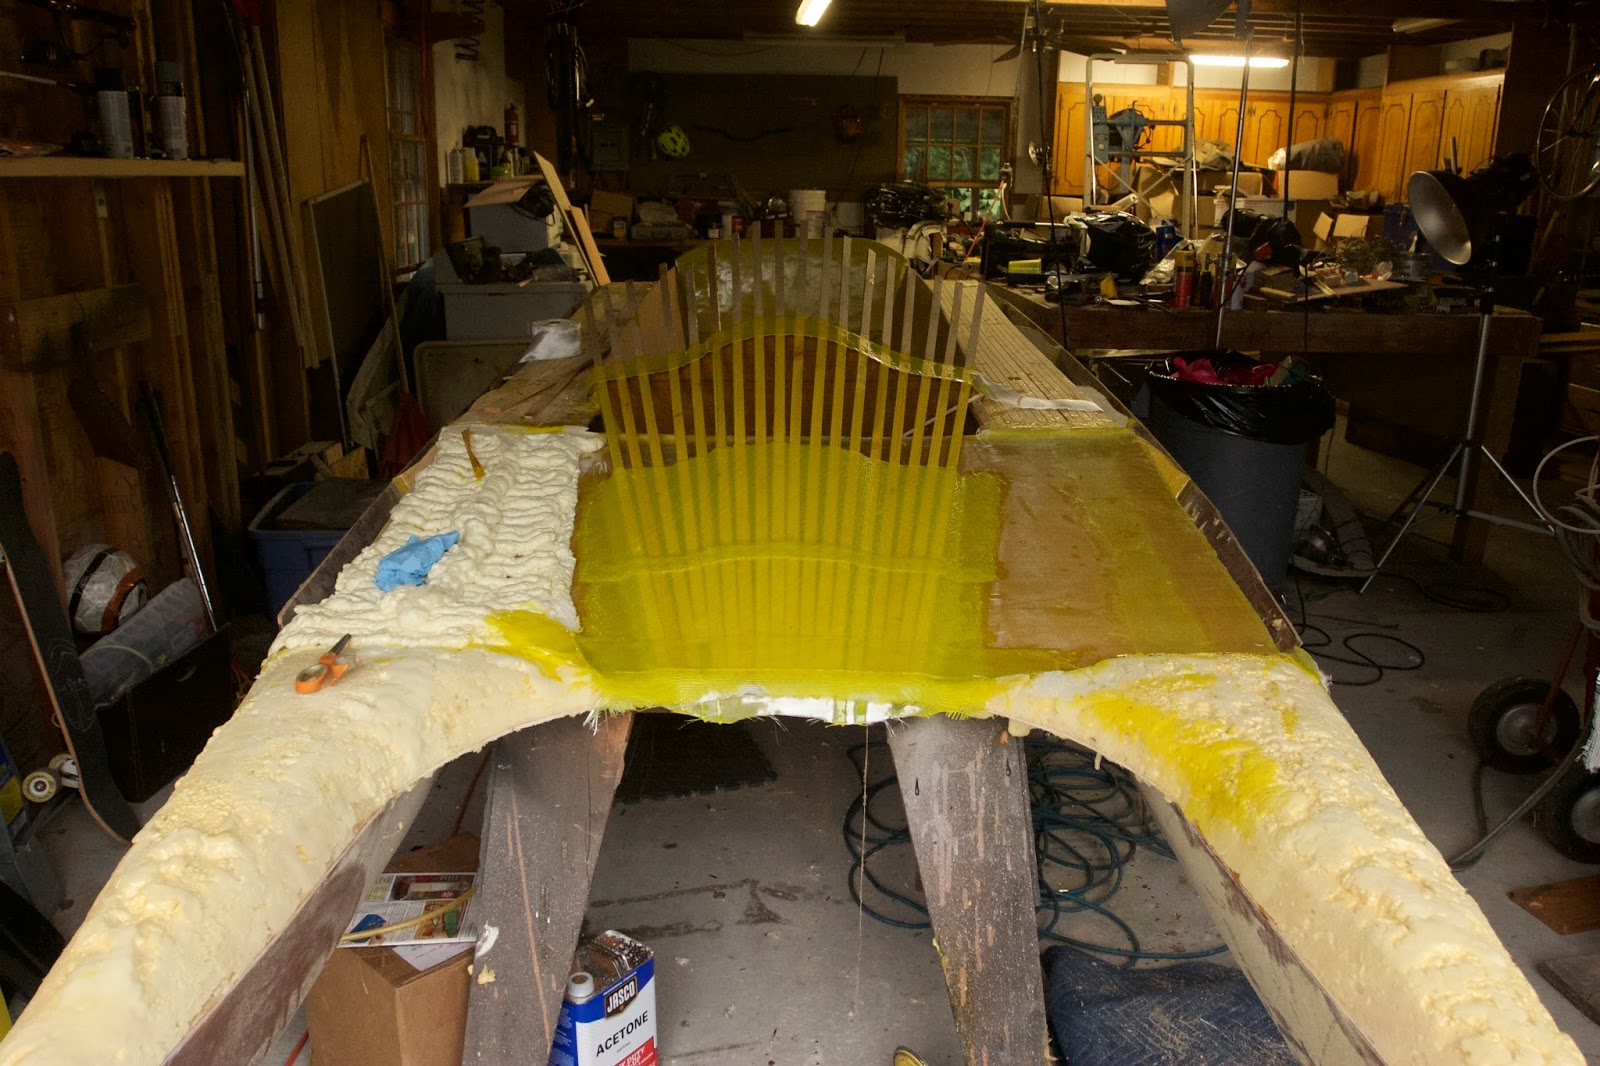
Today we started forming the cockpit fairing.  To do this we cut a radius on a thin piece of ply and epoxied it in place.  We used this to hold pine battens.  These were resin coated and stapled in place.
Over these, we are adding layers of heavy biax glass.
After the pontoon foam and cockpit fairing is satisfactorily shaped, the whole deck surface will get a lamination of glass cloths to bring it up to strength.


Thursday, October 29, 2015

Hydro creeping forward

We have recently been working on the decking and top sides of the hydro on evenings and weekends.  House construction is taking most of our time. There are no good photos yet of the top sides but we will wheel it out to the sunshine and get some this weekend.
Here is a month old image of the glass skin being affixed to the sponsons...